Create and Add NetworkedBlogs Widget in Blogger. Traffic generation is the main concerns for every publisher in the current social media and social networking ear.NetworkedBlogs is an extension of the NetworkedBlogs Facebook Application to make user-generated blog directory accessible outside Facebook and provide more exposure to your blogs.
I have took some screen shots and prepared step by step tutorial and by using it, i will show you how you can add NetworkedBlogs Widget in your Blogger blog or if you are familiar with wordpress then you can add it to the wordpress also. You will definitely generate some traffic after adding this widget in your blog because there are 500,000 Blogs network is waiting for you.
Step 1. Open this link - http://www.networkedblogs.com/ and click on Add your Blogbutton.

Step 2. It will now ask your for your Facebook credentials, enter your facebook user name and password and go ahead.
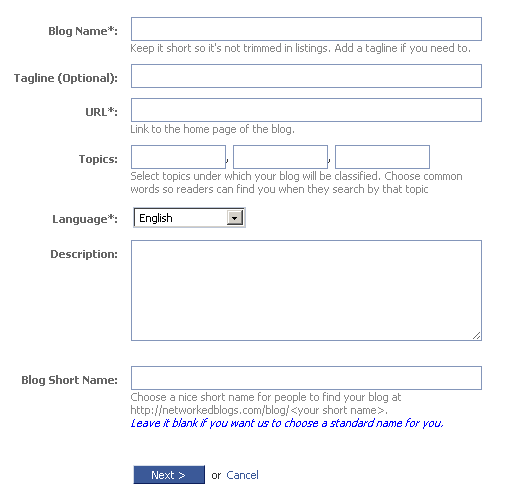
Step 3. Now Open this link - http://apps.facebook.com/blognetworks/editblog.php andAdd your blog or site details in it (see below screen shot) and click Next button.

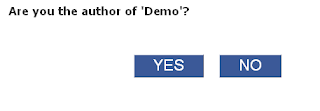
Step 4. It will ask for Are you the author of 'BLOG NAME'?, just click on YES button and move ahead.

Step 5. Now you need to choose the verification method to verify ownership of 'BLOG NAME'?
- Ask friends to verify you (easy, but takes a little time)
- Use widget to verify ownership (instant, but some technical skills required)
Click on Use widget to verify ownership (instant, but some technical skills required).
Step 6. Now Click on Install Widget >> button, and give the option to Copy the Following Code for Widget. Copy that code.
Step 7.Insert it into your blog template on the right-side column (not in a new post)
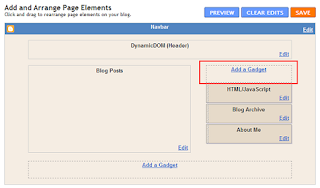
- To add the code in blogger, first Log-in to your blogger account and navigate to Layout >> Page Elements.
- Click "Add a Gadget"
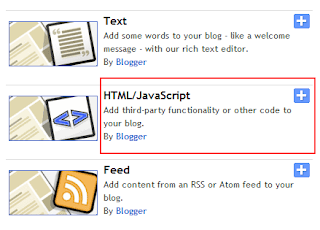
- Paste the HTML code you copied from NetworkedBlogs into the text area and click save. You're done.
Step 8. Click on Verify Widget button on Networkedblogs page and done! :)
- So now install your widget in your blogger or wordpress blog and start getting some extra traffic using Networkedblogs. Share you comment if you want to share or say something to us.
This Post is written by: Ritesh R. Warke GPRS Expert & Webmaster.
Ritesh R. Warke is a professional Ethical hacker, web designer and front end web developer.
Follow him on FACEBOOK.
Also visit our another blog
HOLLYWOOD HOTTIES PHOTOSHOOTS HIGH QUALITY
I have took some screen shots and prepared step by step tutorial and by using it, i will show you how you can add NetworkedBlogs Widget in your Blogger blog or if you are familiar with wordpress then you can add it to the wordpress also. You will definitely generate some traffic after adding this widget in your blog because there are 500,000 Blogs network is waiting for you.
Steps to Add NetworkedBlogs Widget in Blogger
Step 1. Open this link - http://www.networkedblogs.com/ and click on Add your Blogbutton.

Step 2. It will now ask your for your Facebook credentials, enter your facebook user name and password and go ahead.
Step 3. Now Open this link - http://apps.facebook.com/blognetworks/editblog.php andAdd your blog or site details in it (see below screen shot) and click Next button.

Step 4. It will ask for Are you the author of 'BLOG NAME'?, just click on YES button and move ahead.

Step 5. Now you need to choose the verification method to verify ownership of 'BLOG NAME'?
- Ask friends to verify you (easy, but takes a little time)
- Use widget to verify ownership (instant, but some technical skills required)
Click on Use widget to verify ownership (instant, but some technical skills required).
Step 6. Now Click on Install Widget >> button, and give the option to Copy the Following Code for Widget. Copy that code.
Step 7.Insert it into your blog template on the right-side column (not in a new post)
- To add the code in blogger, first Log-in to your blogger account and navigate to Layout >> Page Elements.
- Click "Add a Gadget"
- Paste the HTML code you copied from NetworkedBlogs into the text area and click save. You're done.
Step 8. Click on Verify Widget button on Networkedblogs page and done! :)
- So now install your widget in your blogger or wordpress blog and start getting some extra traffic using Networkedblogs. Share you comment if you want to share or say something to us.
This Post is written by: Ritesh R. Warke GPRS Expert & Webmaster.
Ritesh R. Warke is a professional Ethical hacker, web designer and front end web developer.
Follow him on FACEBOOK.
Also visit our another blog
HOLLYWOOD HOTTIES PHOTOSHOOTS HIGH QUALITY


0 comments:
Post a Comment